A sketchpad is a plain sheet of paper collated and normally bound and it is used for drawing and most often sketches. Right from basic levels of education, every school child is obligated to have a drawing book or sketchpad for doing drawings. It should be obvious how important drawing is because it builds up the creativity of an individual in many ways. Artists, painters, illustrators, animators, etc always have a sketchpad on which their preliminary drawings are done before making of the final work. The process which a design work goes through before finishing is known as the design process. Sketches made in the design process are done on a sketchpad for easy referencing. Why keep a sketchpad?
If you have been watching movies, animations, illustrations, and the like, then be aware that these products were birthed through a whole process in which drawing played significant roles. Before a movie is shot or produced, after the writing of the script, a storyboard is created. a storyboard consists of a series of drawings done according to a script to capture the chronology of events or actions in a play. The drawings can be done directly on a pc but there still exists the need for a sketchpad.
Drawing or illustrating ladies' shoes in Adobe Illustrator
This is going to be a quick tutorial for it is cool to get fast.
Due to the importance of a sketchpad to me, I draw on my sketchpad first, take a shot and then transfer it to my PC for tracing in Illustrator.
Open Adobe Illustrator and create a new document by selecting NEW and choosing your preferred document size.
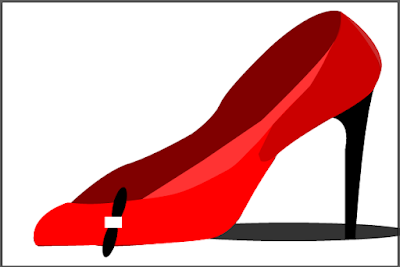
Final illustration to be learnt in this article
Click File and select Place(Shift+ Ctrl+ P) to select and place a shot of our drawing. Locate the image and select it from the directory folder, and click Place to place the image in Adobe Illustrator. Drag the image on the artboard to place it and resize it to fit the artboard. Lock the image by clicking Ctrl+2 or go to the Object tab and hover over the Lock and click on Selection.
Place image
The major tool for our tracing is the pen tool. Select it from the tools panel or simply press P on the keyboard. To make sure you see the Pen strokes as the tracing is done, reduce the opacity of the placed image. After tracing we unlock the image and delete it because we need it not again.
Tracing with the pen tool
Make sure to trace properly by enclosing every space and after that, the painting can be done. To paint, just select the selection tool and pick a fill colour to fill the shapes. The image shown below has the effect of light portrayed in the illustration. It is all about having some understanding of how light shows on objects so that as this is depicted well, form is added to the work to make it look solid and real.
This is the illustrated shoe with a shadow added to make it look solid.











Comments
Post a Comment
Share your views on this insightful content