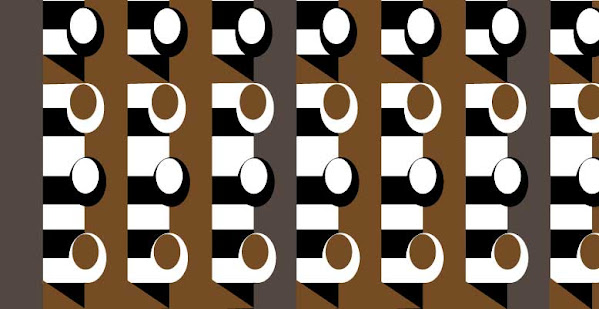
Adobe Illustrator offers wonderful features for a design like this. Any version of the app can be used for this work. A very simple design anyone can get a useful idea from. First, conception is key to executing any form of design work and this pattern design is not an exception at all.
 |
Final design
|
Let's get started with the steps involved to do this.- Firstly, select the new tab from the ribbon beside the 'home icon' and click on the 'Art and Illustration' tab from the window that opens. Click the size named 'postcard'.
 |
fig 1
|
- Pres 'Ctrl+0' to resize the artboard to fit the window.
Right-click the shape tool from the tools panel and click the rectangle tool from the side menu. Drag to draw the rectangle as shown below in fig 2. You can change the color of the shape fill or stroke below the document tabs. Adjust the shape stroke to '0'.
 |
| fig 2 |
Select the drawn shape by clicking the 'selection tool'. Press and hold 'alt' and drag the shape to create a copy at the side of the one drawn. The space in between should be equal to the width of the drawn shape. Press 'Ctrl + D' to repeat this action till the artboard is filled as you want. Your design should now look as the one below.
 |
| fig 3 |
- Click the rectangle tool and create a rectangle that stretches across the artboard. Change the color of the rectangle fill to black. Press 'alt' and hold as you drag the rectangle to create a copy below it. Press 'Ctrl + D' to repeat this action. Your design so far should be like the one in figure 4.
 |
| fig 4 |
- Right-click the shape tool and select the circle tool. Press 'shift', hold and drag the circle tool to draw a circle. Click the 'Edit tab' and click on copy. Click the 'Edit tab' again and click on paste in place. Change the shape color to white and hold shift as you drag the shape to reduce its size.
 |
| fig 5 |
- Click the select tool or alternatively, press 'V' and click on the black circle. Hold shift and press the white circle too. Click both selected shapes and drag them onto the next vertical bar. Press 'Ctrl + D' to repeat the action to the edge of the artboard. Drag the two selected shapes below the first one. Click an empty space to deselect the shapes. Click the white circle and change the color to brown. Repeat the action for the black and white circle to create a white and brown circle directly below the previous one. See figure 6 below.
 |
| fig 6 |
- Hold shift and select all the rectangles and press 'Ctrl + 2' to lock the rectangles. With the selection tool selected, drag from the first circles to cover all the circular shapes. Click copy from the object tab. Click the object tab and select paste in front. Use the down arrow key to push the pasted shapes to the bottom to look like the one below.
 |
| fig 7 |
- Right-click the shape and select polygon or star tool. Click the artboard and enter 3 in the size area. Click 'ok'.
 |
| fig 8 |
- Click the direct selection tool beside the selection tool. Click the corners of the rectangle to make it form a right-angled triangle. Select and drag it to create its duplicates as seen below.
 |
| fig 9 |
- Your design should be similar to the one in fig 10.
 |
| fig 10 |
Click the file tab and this window below appears.
 |
| fig 11 |
Click artboard, select the format to save the file in, enter the name to save it with, and click 'Export Artboard'.
 |
| fig 12 |
You have just created this nice design. Experiment with different colors to see their effects and you can save them for future use if any need arises. Adobe illustrator provides wonderful tools as you have just experienced and it gets better when you practice more to see the behavior of the various tools.


Comments
Post a Comment
Share your views on this insightful content